


This section will focus on tips, tricks, and things to consider when you create the various copies of your book. This includes formatting the inside of your Paperback book, creating the book jacket, getting an ISBN, and much more.

Audiobooks are ever-growing in popularity and with good reason. They are easy to consume while allowing people to multi-task in their busy lives. So when it comes to making an Audiobook, quality is a must.
You do have the choice to have this outsourced as well, which would mean, someone reads and records the book, produces the edited, clean version, fixes any errors or omissions, and delivers final export files. This can be extremely expensive, so be warned. And even so, I like recording my own audiobooks. Not always a fan of listening to and editing them, but even so it can be fun. Plus, this is for people who plan to do it all on their own, so let’s continue.
STEP #1 - Recording Your Audio
Software: Adobe Audition
Equipment: Lots and lots of blankets and a small room like a closet
M1 Rode Mic
XLR Cable
Pop filter
M-Audio AIR 192|4 — 2-In/2-Out USB Audio Interface
Seeing this much equipment can look intimidating, but I promise it’s not too bad. I’ll break it down.
Adobe Audition
This is known as a DAW or digital audio workstation, which is a fancy way of saying, this will be how you record and edit audio. Just like all other Adobe software, I’ll do my best to keep it extremely simple and user-friendly. There are lots of DAWs in the world if you want to find a different place to work, but for this purpose, I’ll be going through Audition.
Pop Filter
This is a MUST. They are cheap, like $10-15 and some even come with the microphone. Pop filters break up the hard-sounding plosives like words that begin with the letter P. This makes sure that you won’t have any painful and grading sounds when recording your story.
Blankets
It’s always a good idea to deck out your recording space, whether it be a closet, a bedroom, or a basement, with a few blankets. Blankets are a great way to dampen outside sounds and echoes. This helps improve audio quality
M1 Rode Mic + XLR Cable
This is the microphone I use, which is a low-end professional, and mainly one I saw a lot of people say was great for voice-overs on YouTube. You can use a microphone that is simply a USB mic if you can only afford cheaper options, just consider the quality you will be getting. I would highly recommend doing some deep research on mics and setups. It’s important and can be expensive. But also expensive doesn’t always mean quality, so keep that in mind.
M-Audio AIR 192|4 — 2-In/2-Out USB Audio Interface:
If you are getting an XLR cable microphone, you will need some sort of audio interface, which you can plug your XLR power cable into, and which can be plugged into your computer. This could be a ten-page doc to explain all of this stuff, so I do apologize, but this will require a little bit of self-research. But you can YouTube the above equipment as a good starting point.
With your equipment set up, the first thing you are to do is narrate your audiobook. I find it is best to do this in small chunks, since if you are in a small room with tons of blankets, you will get hot quickly. Drinking lots of water is also very important. It keeps your throat from cracking or getting sore and also helps cut down on all the weird noises your mouth tends to make. Try to read at a steady, clear pace, making sure all of the words come out properly. This is more about practice than anything though. The more you do it, the more you learn and improve.
When recording, to meet ACX standards, there are a few things you must include in each audio file. So it’s just easier to do it while you’re recording rather than go back and do it later.
You must introduce every chapter, by saying “Chapter 1 – title” and finish every chapter by saying “End of chapter”
You will also need opening credits at the start of your book, and closing credits at the end.
Opening Credits Minimum Requirements
"[title of audiobook]"
"(subtitle if applicable)"
Written by [name of author]
Narrated by [name of narrator]
Closing Credits Minimum Requirements
The End
STEP #2 - First Round of Edits
Once you have recorded the first pass of your Audio Book, you will want to do a few things. The first thing to do is create an organized folder system. You will want two folders to start at the minimum. The first folder will be Raw Audio. The second will be Edited Audio. You will want to take all of your raw audio recordings and copy them into the edited file before you start editing, so they will be in two places at once. The reason for this is because Adobe Audition is known as a destructive editor, which means making edits to your file, will be permanent after being saved. This is fine, but it’s always good to have an unedited backup to cover for potential mistakes. 2 minutes of extra work to save some massive future headaches.

Raw Audio - will contain all of your files before they have been touched. These will be your backups if you were to make a mistake or cut a piece of audio by accident.
Edited Audio – These will be where you store the audio files that are being edited. Assuming you didn’t record a perfect narration from start to finish, you will need to edit your audio files and cut out all of the bad takes and stutters. Do this for all of your audio files, so that you have a clean audio track.
Now open up Audition. Go to File, open, and select your chapter 1. (I will be referring to things as Chapter 1, but you will do this for all of your chapters.)
You will see something like this, with your chapter’s waveform. For the time being, the only thing you should worry about is finding all of your mistakes and cutting them out. All you have to do is on your waveform monitor (center screen) click and drag your mouse to make selections. Then hit delete, and poof, your mistake is gone.
Your space bar is your play button, so hit play, listen, pause and cut out the mistakes, until you have one fluent audio file. This will likely mess up some of your pacing for the read, but we will handle that, so no worries.

STEP #3 - MultiTrack Editing
In Adobe Audition, you have the option to create things called multi-track sessions. This allows you to layer tracks together and is typically used in music or higher production stuff. Luckily, we won’t need to be doing anything fancy here.
The benefit to using a multi-track session is that you can cut up your audio, and move it around the track without having to add silent sections like you would have to in the audio editor.
The goal of this is to now take your book chapter by chapter, and make sure the pacing is good. Think of this as a dry run. You want to cut and move the audio waveforms, so that the book reads at a good pace, and doesn’t sound like you never stop to take a breath. This takes a little practice, but if you treat it like you are listening to the book as a perspective listener, then you will start to develop where to add some more space between lines, and or cut out space. Practice makes perfect.
Use the razor tool, which is the little razor icon at the top, to splice your audio. Then move the audio on the right until it sounds clean and smooth. It’s best to always move the right side of the audio as you go along because you won’t have to select all your clips and move them together each time when you make a cut. It can be a bit tedious but will make your audio sound much better.

STEP #3 - Audio Clean Up
Now it is time for the final step – add some simple effects, and give it one final listen.
First, open up your multi-track session. Then export the entire session. This will be your finished file, so save it in your finished files folder. Use the settings below, which are as follows:
File Name: “Nameofbook_CH”
Format: MP3
Sample Type: 44100Hz Mono 16-bit
Format settings: MP3 192 Kbps CBR
That is the file format to upload your files later, so it just makes sense to do it now.
This is also the file you want to apply your effects to.
Reopen the mixed-down file, only this time you will be back in your editor window. This makes life much easier to apply the effects to.
After that, you are prepared to add your effects and make your audio sound as crisp, clean, and enjoyable as it can. After all, that’s what matters most in an audiobook.
You are free to make adjustments as you see fit, but if you are not much of an audio technician, then these simple steps should be good enough as a catch all for most people.
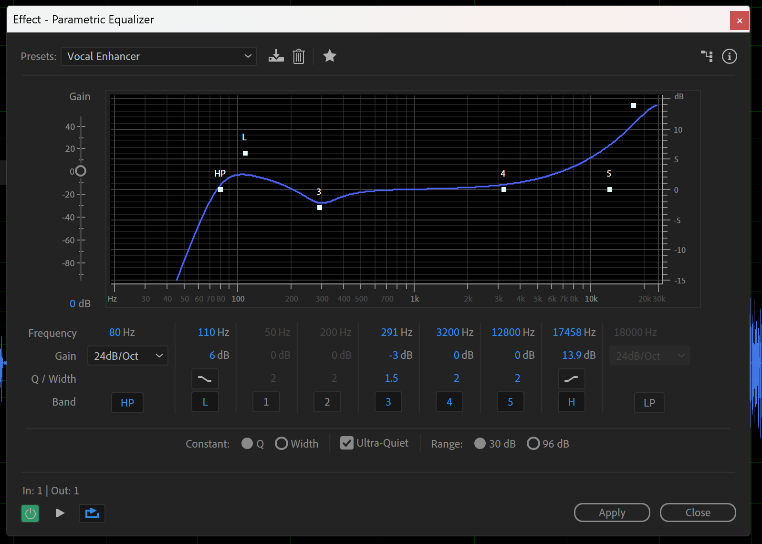
Parametric Equalizer – Under effects, you will find EQ. There is so much you can do with EQ, but you can also destroy your audio very quickly if you do not know what you’re doing. So I will make this extremely easy. Choose the pre-set called “Vocal Enhancer” and hit apply.

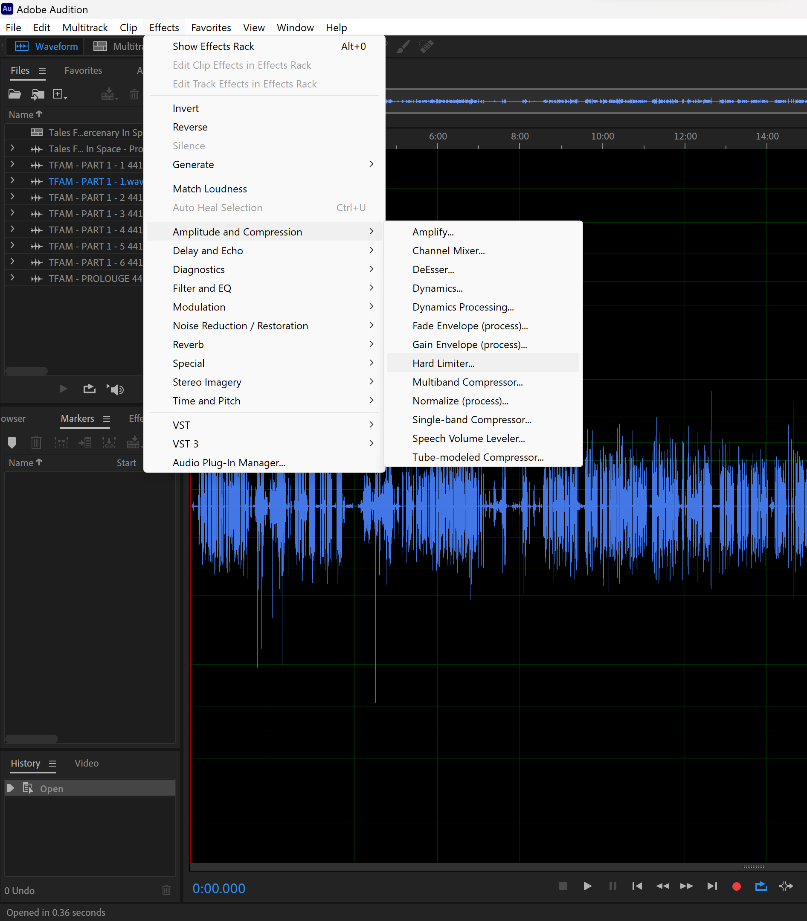
Hard Limiter – A hard limiter is exactly what it sounds like. It will chop off any sound that goes outside of the range you set. This is okay, because we will only be using it to chop off the super-high peaks, and we will be restoring them in a sense in the next step. Set your hard limiter to either -5db or -4db, either or works.

Dynamics – Now add some dynamics to your voice. Doing so will help make sure your voice and your levels are consistent from start to finish. There isn’t much reason to mess around with the setting here. You can make small tweaks to the compressor, but don’t bother touching the other components. Chances are they will just make more of a mess than help.

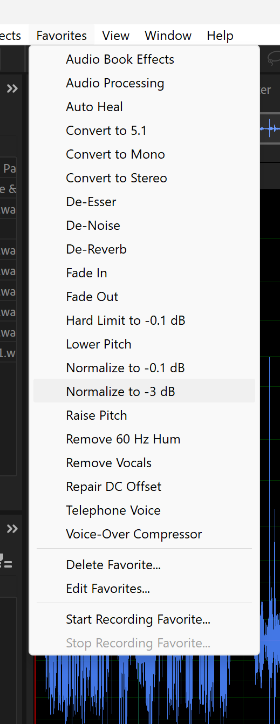
Normalize to -3db – Now normalize your audio so that it is at appropriate levels. Assuming your levels are fairly smooth, and not showing a bunch of peaks and valleys, then this will be straightforward. At the top, go to favourites, and select normalize to -3db. This boosts all of your audio, but will not go over -3db, which is required for ACX quality control.
Run amplitude statistics - The final step is to make sure that the levels will be approved by ACX. Select Run Amplitude Statistics. When you do that you will be given a bunch of information that is not overly useful, but what you are looking for is the RMS level. If it is between -18db and -23dbs then you are good to go. If not, you might have to look for any extreme peaks in your audio and make them quieter, then run the normalize to -3db step again.
You might not see your amplitude statistics window, and if that is the case, go up to the top bar, choose the window drop-down, then find amplitude statistics and select it to make the window appear.
Assuming you saved each chapter to the correct export settings above, then congratulations, you have recorded and edited your first audiobook.
Checklist:
PDF of the final book, formatted and ready for print.
PDF of the full book jacket
E-Book File ready for upload
MP3 files of each chapter for audiobook
For those more curious, here is a link to the ACX submission guidelines. ACX


